Learning Through Educational Tools: Shell Thickness
- Benjamin MacRae

- Jun 27, 2018
- 3 min read
Interestingly enough, the last blog on the educational tools is the first that people will read. And this was by design, rather than random chance. This series of blogs was written so that future readers would read the blogs from top to bottom. I ordered them based on how they enter my thought process, while getting ready to print something.

Shell thickness controls the look and strength of a print. For translucent filaments, fewer layers allows more light to filter in, or display an internal pattern. So, you need to consider what you want people to see, once the part is done printing. It can also help provide a smoother finish, particularly if you are covering infill. Since the first few layers often are a bit lumpy-bumpy. Each layer has more support, so each layer comes out smoother. Around 3-4 layers on the top can provide a nice finish.


The number of shells can also influence the strength of the part. The closer a part is to solid, the more strength that it has. Typically, for strength, I wouldn't go lower than 3 shells. It is a good thickness for most prints. Around 4-5 shells are considered the best for a part that is going to be used strenuously. Like a toy, or some other regularly used part. Below, you can see the differences between 2, 4, and 8 shells.
As you can see, 2 shells is pretty thin, around 0.8mm. Each layer is around 0.4mm thick for an average nozzle. This can vary based on other settings. 4 Shells is pretty thick, and just about right for most uses. While 8 shells is very thick, and only really needed for specific applications. The top layer of the educational tool was only 1 shell thick. Which allows us to see what the infill pattern looks like. Though, it definitly isn't very strong. You can also see several flaws, that could have been minimized with more layers.


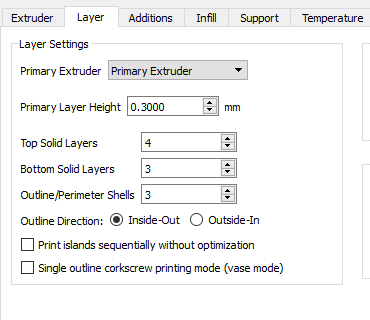
There are typically three shell settings to keep in mind. The top, sides, and bottom. The terminology can vary, depending on the software, but the basic idea is the same. For instance, Cura has its shell thickness in actual millimeters. While Simplify 3D uses layers or shells.
In the left image below, you can see the settings for the top, bottom, and outline shells. Along with a few other settings. You can control whether the printer prints the inner, or outer shells first. Starting with inner shells first can help with overhangs, while starting with outer shells can improve the surface finish. I haven't really tried it, but It should keep some of the extra extrusions hidden.
Printing islands sequentially can influence cooling. Which can help with thin parts of prints. And, last, but not least, Single outline/vase mode. Vase mode works great for vases, or other prints that you want to look amazing. It basically creates one, single outline all along the print. Instead of stopping, and moving to the next line. It prints really fast, and has great results.


The outer layers/shells of any print are incredibly important. They are first, and foremost useful for strength, but they can also influence the finish of a print. The thickness of the outer walls of a print should be one of the first things considered, when setting up a print. I hope that his blog has helped you understand at least a little of why this is so important.
Please read the other blogs in the "Learning from Educational Tools" series. They go into detail on many other terms used in 3D printing, along with my experiences setting up prints.
If you are looking for more information, this article is quite well written.


Comments